Tennis

Tennis is a popular racket sport played by millions of people around the world. It can be played individually (singles) or between two teams of two players each (doubles). The objective is to hit a ball over a net and into the opponent’s court, aiming to score points and win the match. Here are some basics of tennis:

  1. Court: Tennis is played on a rectangular court, which can be made of various surfaces such as grass, clay, or hard court. The court is divided into two halves by a net.
  2. Scoring: Tennis uses a unique scoring system. The basic unit of scoring is the point. Points progress from 0 (love) to 15, 30, and then 40. If both players or teams reach 40, it’s called deuce. From deuce, a player must win two consecutive points to win the game. The first player or team to win six games, with a margin of at least two games, wins the set. Matches are usually best-of-three sets for women and best-of-five sets for men.
  3. Serving: The game begins with a serve. The server stands behind the baseline and hits the ball into the opponent’s service box diagonally across the net. The server must hit the ball into the opponent’s service box on the opposite side during each point. If the server fails to do so, it results in a fault. The server gets two attempts to make a successful serve, except in the case of a let, where the serve hits the net and lands in the correct service box.
  4. Rally: After the serve, the players hit the ball back and forth, aiming to keep it in play and make it difficult for the opponent to return. The ball must bounce within the boundaries of the court for the rally to continue. Players can hit the ball before it bounces or after it bounces once.
  5. Groundstrokes: The most common shots in tennis are groundstrokes, which are shots hit after the ball bounces. The forehand and backhand are the two main groundstrokes. The forehand is typically hit with the dominant hand’s palm facing the net, while the backhand can be hit with one or both hands on the racket.
  6. Volleys: Volleys are shots that are hit before the ball bounces on the player’s side of the court. They are often played near the net, and players use a shorter swing to hit the ball.
  7. Overhead Smash: When the ball is hit high above a player’s head, they can use an overhead smash to hit it forcefully downward into the opponent’s court. This shot is commonly used when the opponent hits a lob.
  8. Faults and Double Faults: If a player fails to hit the ball into the opponent’s service box on a serve, it results in a fault. Two consecutive faults by the server result in a double fault, and the opponent wins the point.
  9. Let: If a serve hits the net but lands in the correct service box, it is called a let. In such cases, the server gets another opportunity to serve without penalty.
  10. Sportsmanship: Tennis emphasizes good sportsmanship and fair play. Players are expected to follow the rules, respect the decisions of officials, and exhibit good conduct on and off the court.

These are some fundamental aspects of tennis. The sport combines physical fitness, skill, strategy, and mental focus, making it an engaging and competitive game for players of all ages and skill levels.

Golf

Golf is a popular individual sport played by millions of people worldwide. It involves hitting a small ball into a series of holes in as few strokes as possible. Here are some basics of golf:

  1. Objective: The objective of golf is to complete a course by hitting a golf ball into each hole with as few strokes as possible.
  2. Equipment: Golf is played using various clubs and a golf ball. Golf clubs come in different types, such as drivers, irons, wedges, and putters, each designed for specific shots. Players carry or use a golf bag to hold their clubs and other accessories.
  3. Course: Golf is played on a course consisting of 9 or 18 holes. Each hole has a teeing area, fairway, rough, hazards (such as bunkers and water hazards), and a green with a hole. Courses can vary in length and difficulty.
  4. Stroke Play and Match Play: There are different formats of golf. Stroke play is the most common, where players count the total number of strokes taken to complete the entire course. Match play involves players competing hole by hole, with the goal of winning the most holes.
  5. Teeing Off: The game begins on each hole with a tee shot. Players place the ball on a tee and hit it with a driver or other club from the teeing area toward the fairway.
  6. Fairway and Approach Shots: After the tee shot, players hit subsequent shots from the fairway toward the green. These shots are known as approach shots and aim to position the ball close to the hole.
  7. Putting: Once players reach the green, they use a putter to roll the ball into the hole. Putting requires precision and touch, as players try to sink the ball in as few putts as possible.
  8. Scoring: Golf uses a stroke-based scoring system. Each stroke taken is counted, and the player with the fewest strokes wins. The score for a hole is the number of strokes taken to complete it, and the total score for the round is the sum of all the hole scores.
  9. Etiquette: Golf has a set of etiquette and rules to ensure fair play and sportsmanship. Players should be respectful of others on the course, maintain a reasonable pace of play, repair divots, and rake bunkers, among other considerations.
  10. Handicap: Golfers often have a handicap, which is a numerical measure of their playing ability. Handicaps allow players of different skill levels to compete against each other on a more equal basis.

These are the basic elements of golf. The sport offers a combination of physical skill, strategy, and mental focus, making it enjoyable for players of all ages and skill levels.

Cricket

Cricket is a popular sport played in many countries around the world, particularly in countries like England, Australia, India, Pakistan, and South Africa. It is a bat-and-ball game played between two teams of eleven players each. Here are some basics of cricket:

  1. Objective: The objective of cricket is to score more runs than the opposing team while dismissing their players.
  2. Field: Cricket is played on a large oval-shaped field known as a cricket ground. The field is typically made of grass and has a rectangular pitch in the center. The pitch is 22 yards long and has wickets at each end.
  3. Teams: Each team consists of eleven players. One team bats while the other team fields.
  4. Innings: In cricket, a match is divided into innings. Each team has a turn to bat and a turn to field. During one team’s batting innings, the other team fields and tries to dismiss the batsmen and restrict the scoring.
  5. Batting: The batting team aims to score runs by hitting the ball and running between the wickets. The two batsmen on the field try to hit the ball and score runs by running back and forth between the wickets. They can also score runs by hitting the ball to the boundary, which earns them four runs, or hitting it over the boundary without bouncing, which earns them six runs.
  6. Bowling: The fielding team has bowlers who try to get the batsmen out. The bowlers deliver the ball from one end of the pitch towards the batsman at the other end. They try to dismiss the batsmen by hitting the wickets or inducing them to hit the ball in the air for a catch.
  7. Fielding: The fielding team tries to prevent the batting team from scoring runs. Fielders attempt to catch the ball, stop it from reaching the boundary, and run out batsmen by hitting the wickets with the ball.
  8. Dismissals: Batsmen can be dismissed in various ways, such as getting bowled (when the ball hits the wickets), caught (when a fielder catches the ball before it touches the ground), run out (when the fielding team removes the bails while the batsman is outside the crease), stumped (when the wicketkeeper removes the bails while the batsman is outside the crease and not attempting a run), or hit wicket (when the batsman accidentally knocks the wickets with their body or bat).
  9. Overs: The game is divided into overs, with each over consisting of six deliveries (or balls). After six balls, the bowler switches ends, and another bowler takes over from the other end.
  10. Umpires and Scoring: Umpires officiate the game, making decisions and ensuring fair play. They also keep track of the score. Runs are scored, and wickets and overs are recorded to keep score.

These are the basic elements of cricket. The sport has various formats, including Test matches, One-Day Internationals (ODIs), and Twenty20 (T20) matches, each with its own rules and gameplay variations.

American Football

American football is a popular sport in the United States known for its physicality and strategic gameplay. Here are some basics of American football:

  1. Objective: The goal of American football is to score more points than the opposing team within a designated time period, typically four 15-minute quarters.
  2. Teams: Two teams, each consisting of 11 players, compete against each other. The team with possession of the ball is called the offense, while the team defending against them is called the defense.
  3. Field: The game is played on a rectangular field, typically 100 yards long and 53.3 yards wide. The field is divided into 10-yard segments, with goal lines at each end.
  4. Scoring: Points can be scored in several ways:
  • Touchdown: A team scores six points by advancing the ball into the opposing team’s end zone.
  • Extra Point: After a touchdown, the scoring team can attempt to kick the ball through the goalposts for an additional point or run/pass the ball into the end zone for two additional points.
  • Field Goal: A team can kick the ball through the opponent’s goalposts for three points.
  • Safety: If the defense tackles the offensive ball carrier in their own end zone, the defense scores two points.
  1. Gameplay: The offense attempts to move the ball down the field by running or passing it, while the defense aims to stop their progress and regain possession. The offense has four attempts, called downs, to advance the ball at least 10 yards. If they succeed, they receive a fresh set of downs. If they fail, the other team gains possession.
  2. Positions: Different players have specific roles on the field, including:
  • Quarterback (QB): The leader of the offense who throws passes and directs the team’s plays.
  • Running Back (RB): The primary ball carrier who runs with the ball.
  • Wide Receiver (WR): Receives passes from the quarterback.
  • Offensive Linemen: Block and protect the quarterback and ball carrier.
  • Defensive Linemen: Aim to sack the quarterback or stop running plays.
  • Linebackers: Defend against both the run and pass plays.
  • Defensive Backs: Defend against the pass and attempt to intercept the ball.
  1. Time Management: The game is divided into four quarters, with breaks between each quarter and at halftime. The clock stops for various reasons, such as incomplete passes, timeouts, and penalties.

These are just the basics of American football. The sport has many rules, strategies, and intricacies that make it an exciting and complex game.

Creole

Vyan nan pa konn fet san zo – no effort no gains

Bato: travay

Yo tayer gorge mwen – they diminished me

Chanm lan klere

Ou ferarye

Mwen kontan konnesans lan

Mache nan sam

Bab ou blanch ou ka pale de sa

Pran a la legere

Carement

O lala

Dimunise

Leuw se gason ou bezwen zouti

Yon plat complet

Relax monche

Male bel moun

Expression

Gason pa kanpe

Sòt pa touye w, men li fè w swè –

stupidity isn’t fatal, but it creates a lot more work for you.

Sezi kou berejèn – Very surprised

Lè Ti Poul Fè Dan – never

Mete Dlo Nan Diven Ou – calm down

Achte Figi Moun – don’t kiss up to nobody

Li Pa Gen Nen Nan Figi L – no shame , no pride

Bondye fe san di. – God acts and doesn’t talk.

Bel dan pa di zanmi. – Just becasue someone is smiling at you doesn’t mean they’re your friend.

Deye mon, gen mon. – Beyond the mountains, more mountains.

Fanm pou you tan, manman pou tout tan. – Wife for a time, mother for all time.

Makak pa janm kwe petit-li led. – A monkey never thinks her baby’s ugly.

Manman pa janm mode pitit li jouk nan zo. – A mother never bites her child to the bone.

Milat pov se neg, neg rich se milat. – A poor mulatto is black, a wealthy black is mulatto.

Pal franse pa di lespri pou sa. – Speaking French doesn’t mean you are smart.

Piti, piti, wazo fe nich li. – Little by little the bird builds its nest.

Words

Wololoy

Illusion

an instance of a wrong or misinterpreted perception of a sensory experience.

Etymology : From Old French illusion, from Latin illūsiō, from illūdere, from in- (“at, upon”) + lūdere (“to play, mock, trick”).

misleading image presented to the vision : optical illusion. (2) : something that deceives or misleads intellectually. b(1) : perception of something objectively existing in such a way as to cause misinterpretation of its actual nature.

For example, hearing voices regardless of the environment would be a hallucination, whereas hearing voices in the sound of running water (or another auditory source) would be an illusion.

The psychological concept of illusion is defined as a process involving an interaction of logical and empirical considerations. Common usage suggests that an illusion is a discrepancy between one’s awareness and some stimulus

Illusion — an instance of a wrong or misinterpreted perception of sensory experience. Reality — the state of things as they exist, as opposed to an idealistic or notional idea of them.

Why illusions happen ?

Your senses gather information and send it to your brain. But your brain does not simply receive this information—it creates your perception of the world. This means that sometimes your brain fills in gaps when there is incomplete information, or creates an image that isn’t even there!

According to that, there are three main classes: physical, physiological, and cognitive illusions, and in each class there are four kinds: Ambiguities, distortions, paradoxes, and fictions.

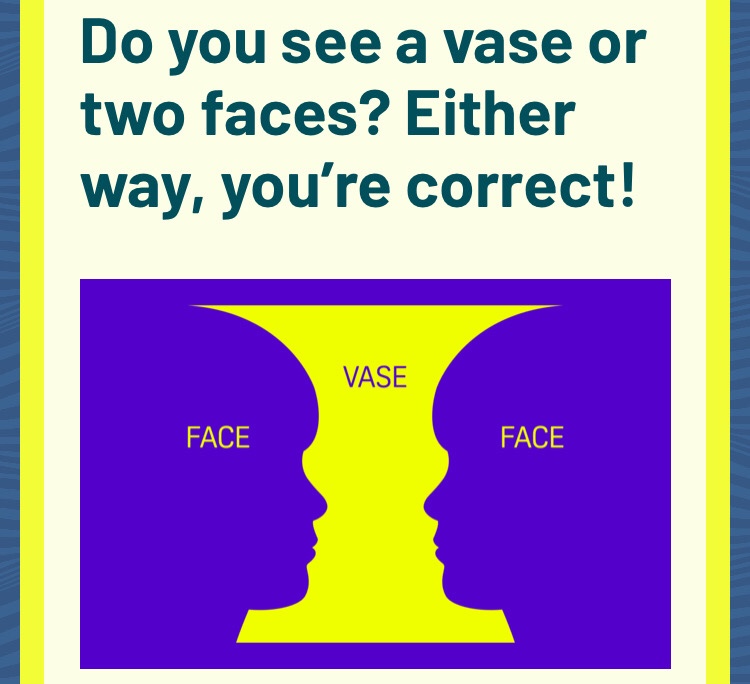
Also known as visual percepts, optical illusions refer to how your brain wrongly interprets what you see.

You might be able to see the vase and the faces. But you probably can’t see both at the same time

Your brain has to make a decision about which part of the picture is the object and which part is the background. Maybe you see the faces. That means your brain is interpreting the rest of the picture not as a vase but as the background. Maybe you see the vase instead. In that case, your brain is interpreting the rest of the picture not as faces but as the background.

Why does this happen? Evolution! Survival depends on fast reactions. Your brain has evolved to work quickly to piece together whatever bits and fragments it can get—and to do its best to figure out the rest.

How to sew

Sewing is a versatile skill that allows you to repair or create various fabric projects. Here’s a general guide on how to sew:

  1. Gather Sewing Supplies: Collect the necessary sewing supplies, including a sewing machine (or a needle and thread if sewing by hand), fabric, scissors, pins, measuring tape, and a seam ripper.
  2. Prepare the Fabric: Pre-wash and iron the fabric to prevent shrinkage and ensure a smooth sewing process. If needed, lay out and cut the fabric according to your project’s pattern or measurements.
  3. Thread the Sewing Machine (if applicable): If you’re using a sewing machine, thread it according to the manufacturer’s instructions. Ensure the machine is set up correctly with the appropriate thread and needle for your fabric.
  4. Pin the Fabric: Pin the fabric pieces together, aligning the edges that need to be sewn. Insert the pins perpendicular to the fabric, with the heads facing away from the sewing line. This will help keep the fabric in place while sewing.
  5. Set Up the Sewing Machine (if applicable): Adjust the stitch length and width on the sewing machine according to your needs. Test the machine on a scrap piece of fabric before starting to sew.
  6. Sewing Techniques:
  • Straight Stitch: Align the fabric under the needle, lower the presser foot, and slowly begin sewing forward. Guide the fabric with your hands, keeping a consistent seam allowance. Backstitch at the beginning and end to secure the stitches.
  • Zigzag Stitch: Use a zigzag stitch for finishing raw edges or creating decorative embellishments. Adjust the stitch width and length to achieve the desired effect.
  • Topstitching: Topstitching is sewing visible stitches on the outside of a garment, often along edges or seams. Use a longer straight stitch and take care to keep the stitching straight and parallel to the edge.
  1. Finishing Techniques:
  • Backstitching: To reinforce the beginning and end of a seam, sew a few stitches forward and then reverse the direction to sew back over those stitches. This prevents the stitches from unraveling.
  • Seam Finishing: Depending on your project and fabric, you can finish raw edges using techniques such as zigzag stitching, serging, or using bias tape.
  • Hemming: To create a neat hem, fold the fabric edge over twice and sew along the folded edge. Alternatively, you can use techniques like blind hemming or machine hemming.
  1. Practice and Experiment: As with any skill, practice is essential for improving your sewing abilities. Start with simple projects and gradually take on more complex ones. Don’t be afraid to experiment with different stitches and techniques.
  2. Learn from Resources: Utilize sewing books, online tutorials, or classes to learn new techniques and gain inspiration. There are many resources available that can help you develop your sewing skills.

Remember to take your time and be patient as you learn to sew. With practice, you’ll become more proficient and confident in your sewing abilities.

Change tire

Knowing how to change a tire is an essential skill for any driver. Here’s a step-by-step guide on how to change a tire:

  1. Find a Safe Location: If you experience a flat tire while driving, safely pull over to a flat and stable area away from traffic. Turn on your hazard lights to alert other drivers.
  2. Gather Necessary Tools: Locate the spare tire, jack, lug wrench, and any other tools required. These are often found in the trunk or under the vehicle’s floor.
  3. Loosen Lug Nuts: Use the lug wrench to loosen the lug nuts on the flat tire. Turn them counterclockwise, but don’t remove them completely at this stage.
  4. Position the Jack: Consult your vehicle’s manual to identify the correct jack points. Place the jack under the vehicle’s frame near the flat tire. Ensure the jack is securely positioned and will lift the car without damaging any components.
  5. Lift the Vehicle: Use the jack handle to raise the vehicle. Pump the jack handle up and down until the flat tire is several inches off the ground. Remember to avoid placing any body part under the vehicle during this process.
  6. Remove the Lug Nuts and Flat Tire: Fully unscrew and remove the loosened lug nuts. Carefully pull the flat tire straight towards you and set it aside.
  7. Mount the Spare Tire: Align the spare tire with the wheel studs and push it onto the hub. Ensure it fits snugly. Then, hand-tighten the lug nuts as much as possible.
  8. Lower the Vehicle: Use the jack to lower the vehicle until the spare tire touches the ground but is not bearing the full weight. Remove the jack completely.
  9. Tighten the Lug Nuts: Using the lug wrench, tighten the lug nuts in a star or crisscross pattern. Apply firm pressure while turning them clockwise. This ensures even tightening.
  10. Lower the Vehicle Completely: Use the jack to lower the vehicle fully to the ground. Remove the jack and verify that all lug nuts are securely tightened.
  11. Check the Spare Tire Pressure: Confirm that the spare tire is properly inflated. Refer to your vehicle’s manual for the recommended tire pressure and adjust accordingly.
  12. Replace the Flat Tire and Tools: Place the flat tire, jack, lug wrench, and any other tools back in the storage area. Ensure they are secure and won’t move around while driving.
  13. Get the Flat Tire Repaired or Replaced: Remember that the spare tire is meant to be a temporary solution. Schedule a visit to a tire professional to repair or replace the flat tire as soon as possible.

It’s crucial to consult your vehicle’s manual for any specific instructions related to changing a tire, as the process may vary depending on the make and model. Practice changing a tire in a safe environment before needing to do it on the roadside.

Iron

Ironing clothes properly can help remove wrinkles and give them a neat, crisp appearance. Here’s a step-by-step guide on how to iron:

  1. Set up the Ironing Station: Find a clean, flat, and stable surface to set up your ironing board. Ensure there’s enough space around the board to maneuver the garment.
  2. Check the Fabric Care Label: Before ironing, check the fabric care label on the garment to determine the appropriate ironing temperature. Different fabrics require different heat settings to avoid damage.
  3. Fill the Iron with Water (if applicable): If your iron has a steam function, fill the water reservoir following the manufacturer’s instructions. This will allow you to use steam to remove stubborn wrinkles more effectively.
  4. Preheat the Iron: Plug in the iron and set it to the appropriate temperature for the fabric you’re ironing. Allow the iron to heat up fully before starting.
  5. Prepare the Garment: Ensure the garment is clean and slightly damp. If it’s dry, you can lightly spray it with water using a spray bottle. This helps to create steam and makes ironing easier.
  6. Start with the Collar and Cuffs: Begin with the collar and cuffs, as they often require more attention. Unbutton them and lay them flat on the ironing board. Iron each side carefully, moving the iron from one end to the other in smooth, straight strokes.
  7. Iron the Sleeves: Lay one sleeve flat on the ironing board, aligning the seams. Start from the cuff and work your way up to the shoulder, ironing both sides. Repeat the process with the other sleeve.
  8. Iron the Back and Front: Lay the back of the garment on the ironing board, positioning it flat and smooth. Iron from the top down, using long, straight strokes. Repeat the process with the front of the garment, being mindful of any buttons or embellishments.
  9. Pay Attention to Details: For delicate or intricate areas, such as pleats, ruffles, or pockets, use a lower heat setting or place a thin cloth between the iron and the fabric to prevent direct contact.
  10. Hang or Fold: Once you’ve finished ironing the entire garment, hang it or fold it neatly to avoid new wrinkles from forming.

Additional Tips:

  • Work from lighter-colored garments to darker ones to avoid any potential transfer of color or stains.
  • Iron delicate fabrics, such as silk or satin, inside out or place a thin cloth between the iron and the fabric to prevent damage.
  • Be cautious when ironing synthetic fabrics as they can melt or burn if exposed to high heat. Use a lower heat setting or follow the fabric care label instructions.
  • If you’re unsure about ironing a particular garment, consider using a steamer or seeking professional dry cleaning or pressing services.

Remember to always follow the manufacturer’s instructions for your specific iron model and refer to the fabric care labels on your garments. With practice, you’ll become more proficient in ironing and achieve wrinkle-free, well-pressed clothes.

First aid

Knowing the basics of first aid can be valuable in providing immediate care and assistance to someone in need. While it’s important to receive formal training and certification in first aid, here are some fundamental principles and techniques:

  1. Assess the Situation: Before providing first aid, ensure the scene is safe for both you and the injured person. Assess the situation to identify any potential hazards or risks.
  2. Ensure Personal Safety: Take precautions to protect yourself and others from harm. If necessary, use personal protective equipment (such as gloves) to prevent contact with bodily fluids or blood.
  3. Call for Help: If the situation is serious or life-threatening, call the emergency services or ask someone nearby to call for help. Provide clear and concise information about the situation and location.
  4. Check Responsiveness: Approach the injured person and gently tap their shoulder while asking if they’re okay. Look for any signs of responsiveness, such as eye-opening, movement, or response to verbal cues.
  5. Open Airways: If the person is unresponsive and not breathing normally, open their airway by tilting their head back slightly and lifting their chin. This helps to ensure a clear passage for air.
  6. Check Breathing: Observe the person’s chest for any signs of breathing. Look, listen, and feel for breathing movements for about 10 seconds. If the person is not breathing or is only gasping for air, begin CPR (cardiopulmonary resuscitation).
  7. Perform CPR: If the person is unresponsive and not breathing, start CPR by providing chest compressions and rescue breaths. The recommended compression-to-breath ratio is 30 compressions followed by 2 rescue breaths. Continue until help arrives or the person shows signs of life.
  8. Control Bleeding: Apply direct pressure to any bleeding wounds using a sterile cloth or your gloved hand. Maintain pressure until the bleeding stops or help arrives. If necessary, elevate the injured limb to reduce blood flow.
  9. Treat Shock: If the person is showing signs of shock (e.g., pale skin, rapid breathing, confusion), help them lie down and elevate their legs to improve blood flow to vital organs. Keep them warm and reassured while waiting for medical assistance.
  10. Be Prepared for Allergic Reactions: If someone is experiencing an allergic reaction, help them administer their prescribed epinephrine auto-injector (e.g., EpiPen) if they have one. Call for medical help immediately.

Remember, these are just some basic principles of first aid. It’s important to receive certified training and stay updated with current guidelines and techniques. Taking a formal first aid course will provide you with more in-depth knowledge and hands-on practice to handle various medical emergencies.

Create your own website, free on WordPress.com.Create your own website.
Start free